
Managing Checklist Item Status
Here's a concise summary of the checklist's key actions and features:
Adding a New Item:
Click the "+ Add a new item" link at the section's bottom.
Enter the item summary in the text box and press "Enter."
Item Attributes:
Mark Done: Check completed items; they'll change to "Completed," and unchecking them reverts their status to "To Do."
Status Code: Indicate an item's status with color-coded codes.
Description: Add extra item details.
Mark Mandatory: Highlight essential items with a ⭐ star.
Editing an Item:
Click the item to edit its content.
Edit status, description, or status code as needed.
Reordering Items:
Use the ☰ Hamburger icon on the left of an item to drag it up or down for better organization.
Adding a Description:
Click on an item's description to add or update supplementary details.
Deleting an Item:
Hover over an item, and the delete action (bin icon) will appear on the right. Click to remove it.
Hide/Unhide Completed Items:
Toggle "Hide Done" at the top right to hide or unhide completed items.
Marking an Item as Mandatory:
Designate crucial items as mandatory by clicking the ⭐ star icon on the left.
Note: Within Jira, you can enforce mandatory items before resolving a ticket through workflow transitions.
Default item status codes
The item status code serves as an indicator of the item's current state, and our checklist app comes preloaded with a set of default status codes for your convenience.
Status | Purpose | Mark item? |
|---|---|---|
To Do | The item is new and yet to be picked. | Unchecked |
Skipped | Item is skipped and is not done. | |
In Progress | Item is currently being worked upon. | |
Completed | Item is completed | Checked |
Blocked | Item is blocked on something. |
Pro Tip: Utilize the item description to offer additional details as needed. For instance, you can use it to explain the reason for an item being blocked.
You can enable the item description column by navigating to the "Settings" tab under the "Checklist for Jira Cloud" in your project's left panel.
When an item is moved to the "To Do" state, it will automatically uncheck, and conversely, when it's in the "Completed" state, it will be checked, ensuring seamless status tracking.
Creating custom status codes
To tailor the checklist to your project's unique requirements, you have the option to create custom status codes. While Checklist for Jira Cloud offers a range of default item status codes, you can expand these based on the specific needs of your project.
Here's how to do it:
Navigate to the "Status Codes" section by accessing your project's left panel.
Find the "Checklist for Jira Cloud" option and select "Status Codes."
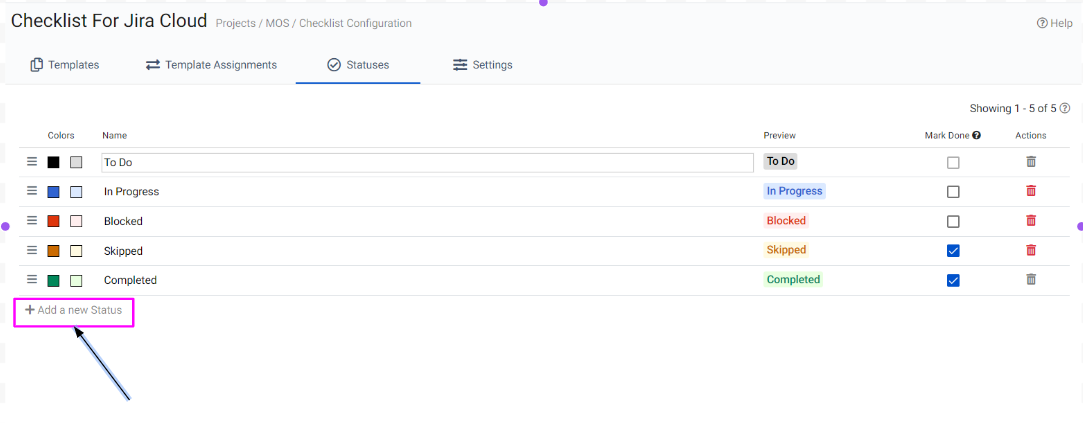
You can easily manage the status codes and customize them your way.